Step 2: Specify Index File
In the second step of the New Task Wizard you need to specify where your backup is stored.
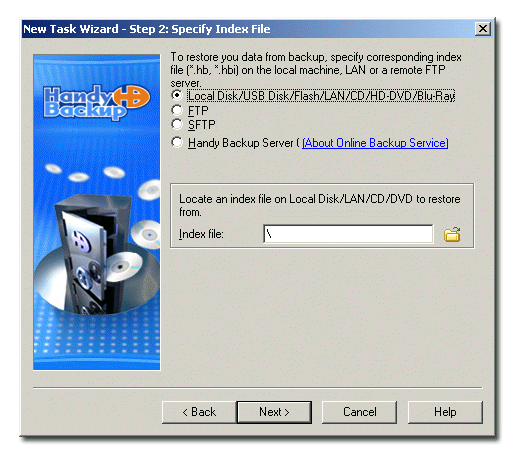
- Select the location of the index file of the backup you want to restore, and then click Next.
- Select Local Disk/USB Disk/Flash/LAN/CD/HD-DVD/Blu-Ray if the backup is stored on a local or external location seen by Windows Explorer.
You may choose between four locations.
Restoring from a local/external/network/removable drive

Type a path or click the Browse for folder  button to browse for the folder with the index file.
Restoring from an FTP server
- Select FTP if the backup is stored on a FTP server.
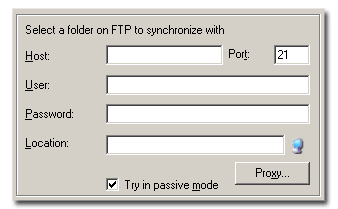
To restore from FTP you will need to specify Host, Port, User, Password, Location and Proxy settings.
- Host: Enter the FTP server name.
- Port: Enter the port number. The default value is 21.
- User: Enter your FTP user name.
- Password: Enter your FTP password.
- Location: Type a path of a remote directory to store your backup to, or click Select FTP folder
 button to select it via the Select FTP folder dialog.
The Select FTP folder dialog window consists of two parts. The upper part contains the list of folders available on the FTP server, while the other shows the FTP session log messages. After establishing an FTP connection, the list of remote directories will appear. Select the desired directory, and then click Select. To create a new directory, click New folder.
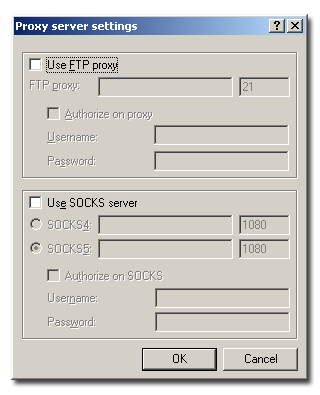
- Click Proxy if your computer is inside a firewall. The Proxy server settings dialog will appear.
- Check Use FTP proxy if you want to use FTP proxy. Specify FTP proxy host and, if necessary, authorization data.
- Check Use SOCKS server if you want to use SOCKS server. Select type of the SOCKS server, specify the server name and, if necessary, authorization data.
- When finished, click OK.
- Click Try in passive mode to initiate the FTP connection, rather than relying on the remote server to set it up. This may be necessary if a firewall does not allow establishing a connection from the outside.
Restoring from an SFTP server
- Select SFTP if the backup is stored on a secure SFTP server.
Restoring from SFTP server is very similar to restoring from FTP, except that Port is 22, and Proxy and Try in passive mode are unavailable. To restore from SFTP you will need to specify Host, Port, User, Password and Location.
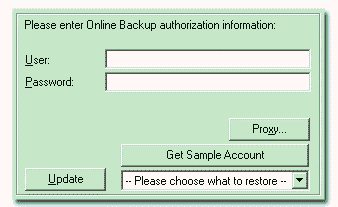
Restoring from a Handy Backup Online account
- Select Handy Backup Online if the backup is stored on your Handy Backup Online account.
- User: Enter your login name.
- Password: Enter your password.
- Description (optionally): Write a brief description of your backup set.
- Click Proxy if your computer is inside a firewall. Specify settings of your proxy server.
- Click Update to download the list of tasks to restore, and then select the needed backup from the dropdown menu.
To use the Online Backup Service, you need to register an account. To do it, click the About Online Backup Service link which will open your default web browser and take you to the web page where you will be able to choose an appropriate storage plan and register your account. You can also access this page at the following URL: http://www.handybackup.net/online-backup.shtml.
To restore from your Online Backup Service account, specify the following options: